Optimizing DOM manipulations

Often there arises a need to make changes to DOM structure, be it adding, removing or relocating elements. And there are so many ways to do them! So today I was just curious to know how fast is one approach than the other. I’ll use two ways and try to show you how long they took to run! And believe me you’ll be amazed!

  1. Live addition to DOM structure using jQuery’s appendTo()
    for(var i=0; i<10000; i++) {
      //assuming an ol element with id = ol1 is present in our DOM
      $('<li>I am an ordinary list element.</li>').appendTo('#ol1');
    }
    
  2. Adding in one go using jQuery’s .html()
    var domString = "";
    for(var i=0; i<10000; i++) {
      //creating a string of html
      domString += '<li>I am an ordinary list element.</li>';
    }
    //adding it in one go
    $('#ol2').html(domString);
    

The Verdict

First approach of adding elements to live DOM tree took ~1296 milliseconds and the second approach to concatenate a string of elements and then add it in one go took just 41 milliseconds.

So the second approach is 30 times faster than the first approach which does additions to a live DOM!

You can check the code on jsfiddle
http://jsfiddle.net/ankeetmaini/fpTXJ/2/

And you can check this live sample, which demonstrates both the approaches and gives the milliseconds elapsed in each approach! This is cool!
http://jsfiddle.net/ankeetmaini/fpTXJ/2/embedded/result/

Writing Modular JavaScript!

Of all the ways in which you can write JavaScript, modular style is one of the most intriguing. It allows you to make your data and methods private. It does it by using closures. Module pattern thrives on the fact that your App can be made more manageable by dividing it into modules. And successfully, hiding, abstracting the detailed parts under those modules, while leaving simple interfaces open to carry out the tasks!

In JavaScript per se, everything is global. So if you’re used to write your code in functions, you would realize that everything you write is global, and can easily be encroached upon by some other code in other files. What if you depended on a global variable’s value, only to have it changed by some other non-suspecting JavaScript code. As a best practice we should always keep our global footprint down to a minimum.

Let’s see module design pattern in action!

var MyModule = (function(){
    var privateVariable;
    var privateMethod = function() {
    };
    return {
        publicMethod: function(){
            //can call private method here
            privateMethod();
        }
   };
}());

That is the simplest module. Anything which is inside return block, is accessible from outside. If you type the above code in console, we’ll see that the privateVariable, and privateMethod isn’t available to us under the global variable MyModule only publicMethod is available. MyModule Building on the same concept we’ll now make another app that is more like a real world app which uses jQuery too. Let’s make an AppleApp.

This app will have a private variable apples which we’ll be decrementing and incrementing by two private methods eatApple() and buyApples(). We will also define another method called viewApples(), this will return us the private variable apples!

We’ll bind methods to buttons like we normally do in a real web application, and this we’ll do in a private method called bindDOMEvents().

var AppleApp = (function ($) {
    //private variables and methods
    var apples = 0;
	var eatApple = function () {
        if (apples > 0) {
            apples--;
        } else {
            alert("Cannot eat. No stock. Buy first.");
        }
		$(document).trigger("ateApple.appleApp");
    };
	var buyApples = function (newApples) {
        apples += parseInt(newApples, 10);
		$(document).trigger("addedApples.appleApp");
    };
	var bindDOMEvents = function() {
		//on button clicks
		$('input#eatApple').on("click", function(){
			eatApple();
		});
		$('input#buyApples').on("click";, function(){
			var num = $('#numberOfApples').val();
			buyApples(num);
		});
		//to display current value of apples
		$(document).on("addedApples.appleApp ateApple.appleApp", function(){
			$('span.box').text(apples);
		});
		//to change the label of button
		$('#numberOfApples').on("change", function(){
			$('input#buyApples').attr('value', 'buyApples('+$(this).val()+')');
		});
		
	};
	
	//our own document.ready function
	(function(){
		$('span.box').text(apples);
		$('input#buyApples').attr('value', 'buyApples('+$('#numberOfApples').val()+')');
		bindDOMEvents();
	}());
    
	//public methods
	return {
		viewApples: function() {
			return apples;
		}
    };
}(jQuery));

There’s a lot going on with the code above. Firstly, we pass jQuery object to our module’s anonymous function as an argument, so that we can access it locally without any conflicts. Then we define apples, eatApple(), buyApples(), bindDOMEvents().

Then we create another self-invoking function closure which executes immediately and we called the above defined bindDOMEvents(). This works because we include our script just before the ending of the body tag, and by then the whole DOM structure is made ready by the browser. Else we would have to use jQuery’s document.ready method.

//our own document.ready function
	(function(){
		$('span.box').text(apples);
		$('input#buyApples').attr('value', 'buyApples('+$('#numberOfApples').val()+')');
		bindDOMEvents();
	}());

And after that we finally have the return block, which contains a public method. It’s the only method which can be called from outside, via AppleApp.viewApples(). I’ve even highlighted the relevant parts!

You can access, copy, edit, and run the code from the following jsfiddle link.

http://jsfiddle.net/ankeetmaini/Ang8x/

And this is the AppleApp in fullscreen!

http://jsfiddle.net/ankeetmaini/Ang8x/embedded/result/

JAX-WS Client: Consuming the JAX-WS webservice!

In this post we’ll see how to write a client to consume the JAX-WS webservices. This client will invoke the methods of a remote webservice. For this we’ll utilize the already created JAX-WS webservice in this post.

Since, it’s the era of webapps, our client too will be powered by Spring MVC! We can make the client in two ways, and each is simpler than the other!

Download the Client’s Source Code!

PizzaStory
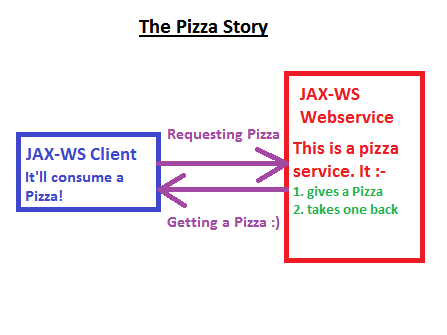
This is what we’re here to do! Order Pizza! 🙂

This picture pretty much sums up the design, architecture and structure of this Producer-Consumer code!

Let’s start!

1. Download and import the PizzaService first, and get it up and running. Confirm by seeing the wsdl file at this location:

http://localhost:8080/webservice-jaxws/PizzaService?wsdl

2. Generate the artifacts using the wsimport tool. This tool will generate the required classes for you from the wsdl file. These artifacts are necessary, because now your client doesn’t know what a Pizza object looks like, and it doesn’t know which methods he can call on the remote webservice, let alone the location of it!

3. Open the command prompt and type in the following command to generate the artifacts.  Before running the command, create two folders “src” and “gen” to have the source and class files generated at different locations.

wsimport -s src -d gen http://localhost:8080/webservice-jaxws/PizzaService?wsdl

The command and its explanation!

The directory structure to be followed is as follows:-

dir

4. Go in the “src” directory, and see the generated artifacts for yourself! I’ve included a screen-shot too! I’m so dilligent 🙂

The prized artifacts!

5. The next thing is to copy these in your client application. I’ve written a small Spring MVC project for this purpose, and included the above classes in it. It’s hosted on Google codes and you can download it!

6. Sending the request via Ajax! We’ll write this piece of code in the form.jsp page, and on click of a button, this ajax request would be sent to the controller which in turn would call the webservices!


<script type="text/javascript">
 $(function() {

$('#invokeWebservice').click(function() {

//Sending the Ajax request, to call the JAX-WS service.
 $.ajax({
 url : '<%=request.getContextPath()%>/invokeWebservice',
 dataType: 'json',
 success: function(data){

//Setting the data in the page, for viewing!
 $('#pizzaSize').html(data.size);
 $('#pizzaCost').html(data.cost);
 $('#pizzaDateOfManufacture').html(data.dateOfManufacture);
 }
 });
 });
 });
</script>

7. Invoking the webservice can be done in two ways:-

a) Using the generated proxy classes by wsimport tool.

This is the controller. The other parts have been omitted for brevity, and only the code concerned with invoking the webservice is shown here. You can see the complete code by downloading the project! Don’t fret! 🙂

@Controller
@RequestMapping("/")
public class ClientController {

 //This gives us a proxy to the remote webservice.
 //Now call the methods on local "pizzaProxy"
 //and the remote ones will be called automatically!
 private PizzaServiceImpl pizzaProxy = new PizzaService().getPizzaPort();

//This handler will be invoked on the Ajax request.
 @RequestMapping("/invokeWebservice")
 public @ResponseBody Pizza getPizza() {
 //The webservice is being invoked by "pizzaProxy"
 //This method returns a Pizza object.
 return pizzaProxy.getPizza();
 }

}

b) Using Spring’s JaxWsPortProxyFactoryBean

For using the JaxWsPortProxyFactoryBean, you need to configure this in the Spring’s WebApplicationContext file.

<bean id="pizzaProxy" class="org.springframework.remoting.jaxws.JaxWsPortProxyFactoryBean">
 <property name="serviceInterface" value="webservice.jaxws.generated.PizzaServiceImpl"/>
 <property name="wsdlDocumentUrl" value="http://localhost:8080/webservice-jaxws/PizzaService?wsdl"/>
 <property name="namespaceUri" value="generated.jaxws.webservice"/>
 <property name="serviceName" value="PizzaService"/>
 <property name="portName" value="PizzaPort"/>
 </bean>

Then autowire this in the Controller!

@Autowired
 @Qualifier("pizzaProxy")
 private PizzaServiceImpl pizzaProxy;

The directory structure of the client project is as shown below:-
projstructure
Run the the client and you’ll see the following screens.
screen1Click the button to invoke the webservice. And you’ll see the response!
screen2
That’s all for this one! Happy consuming 🙂

Git. Made simpler!

Well, by now I guess you must have heard the buzz about this cool Distributed Version Control system, if not then I suggest you use Google for a while! There are a lot of Version Control Systems hanging around in the market, and I can’t say for sure about Git’s superiority over others, mostly because I haven’t worked with others.

But one thing which I do know is that the companies and projects like Google, Facebook, Microsoft, Twitter, LinkedIn, Android, NetFlix, Qt, Eclipse and the like aren’t using Git for no reason.  And now since I too have started using Git, there’s too much to boast and extol about it. 🙂

You can download and read all the good things about Git here.

Once you download the setup, just follow the steps below and you’ll have it up and running in no time. In Windows, installation is no big deal, just a matter of next, next, and next!

Installing Git

This installs Git in your system. To see it in action, right-click and see the new options in the context menu.

Getting Git to Work

Click Git Gui and the opening screen of Git will appear.

Since we’re starting afresh we have no earlier git repositories to work with, we’ll create a brand-new-one! Click Create New Repository

Click on the “Create” button and a new repository will be created for you.

You can view the repository created for you in the Directory Structure too.

Go inside the GrandRepository to see how git saves the versions.

Now since the git is set up, let’s add some files to the project and see version control in action.

Switch to Git Gui and click Rescan button to see the new entry in the Git.

Once you click the “Rescan” button, the git will scan the directory under version control, in our case “GrandRepository” for any file changes and will show in the Git Gui

Stage the file for commit, by clicking the file in Unstaged Changes box.

Write your credentials, like name and email, so that Git will keep track of who changed the files and when.

To see the history of your project.

Make some changes in your New File.txt and do a rescan in Git Gui. You can see below the changes which you have done in the file. (Here I added a line – This is just another line.)

Commit the changes.

Go to Visualize history of all branches to see the changes and where your current branch, master is.

JAX-WS: Webservices with Java EE 6

SOAP webservices were never so much fun and ease before Java EE 6! So without further ado, we’ll see how to get a JAX-WS service up and running in a matter of minutes! The source code is hosted on Google codes, which you can download and directly import into your IDE.

(I used JBoss Developer Studio 5 and JBoss Application Server 7 )

Download the Source Code

We’ll expose a PizzaService as a JAX-WS. Our PizzaService would be a very light-weight service which will have just two functions:-

  1. getPizza – This will buy/get you a Pizza object.
  2. returnPizza – This will help you return a stale/cold/substandard Pizza back!

Let’s define Pizza entity class:-

Pizza.java

package webservice.jaxws.resources;
import java.util.Date;

public class Pizza {
 private String size;
 private Date dateOfManufacture;
 private float cost;

/*Setters and Getters removed for brevity */

}

The PizzaService Interface
PizzaService.java


package webservice.jaxws.service;

import webservice.jaxws.resources.Pizza;

public interface PizzaService {
 public Pizza getPizza();
 public String returnPizza(Pizza pizza);
}

Writing the implementation of the above interface.

PizzaServiceImpl.java


package webservice.jaxws.service;

import java.util.Date;

import javax.jws.WebMethod;
import javax.jws.WebParam;
import javax.jws.WebResult;
import javax.jws.WebService;

import webservice.jaxws.resources.Pizza;

@WebService(serviceName="PizzaService", portName="PizzaPort", targetNamespace="generated.jaxws.webservice")
public class PizzaServiceImpl implements PizzaService {

 @Override
 @WebMethod
 @WebResult(name="pizza")
 public Pizza getPizza() {
 //Creating a new Pizza
 Pizza pizza = new Pizza();
 pizza.setSize("Large");
 pizza.setCost(375.45f);
 pizza.setDateOfManufacture(new Date());

 return pizza;
 }

 @Override
 @WebMethod
 @WebResult(name="PizzaReturnStatus")
 public String returnPizza(@WebParam(name="pizza") Pizza pizza) {
 System.out.println("Pizza returned by the customer :(");
 System.out.println("Details of the returned pizza:-");
 System.out.println(pizza);

 return "Pizza successfully returned.";
 }

}

To expose a class as webservice all you need to do is to annotate it with @Webservice and you’re done!

The other annotations make the generated WSDL file pretty and more-meaningful to read.

  1. @WebMethod – It declares the method as an endpoint. Although the spec says it to be mandatory, but the code still runs once you annotate the service class with @WebService.
  2. @WebResult – It is used when the method is returning something, it gives the returning object a name, else your wsdl file would contain a parameter called “return” which might not seem so much readable once you have got a significant number of methods featuring in a particular webservice.
  3. @WebParam – This is also almost same as @WebResult with the only difference that this annotation is used to make the name of input argument of the endpoint more meaningful. In the absence of @WebParam, the wsdl file would read the input argument as arg0, arg1 etc.

It’s now time to put the code to test and see the output. Run the project and to see the wsdl open up your browser and type in the following url:-

http://localhost:8080/webservice-jaxws/PizzaService?wsdl

The anatomy of the above url is simple enough, http://localhost:8080/webservice-jaxws/ is the server-address and the project location and PizzaService is the service name we defined as an attribute of @WebService annotated at the class PizzaServiceImpl (scroll up to check!)

You can test the above webservice by either writing a client or using Soap-UI which is the easier and quicker way!

UPDATE

A client consuming this webservice can be seen and downloaded from this URL.

That’s all for this one.

MySQL Datasource: JNDI configuration in JBoss AS 7

This post covers the steps to configure a MySQL datasource in JBoss Application Server 7. This datasource can then be referenced via JNDI to connect your application to the underlying Database. I presume you already have a JBoss AS 7 up and running in your development environment. If not, do that first.

Download the MySQL JDBC database driver

  1. Download the latest JDBC driver for MySQL from http://dev.mysql.com/downloads/connector/j/
  2. Save the downloaded zip file and extract the connector jar.

Add the MySQL connector Driver as a Module in Server

  1. Goto: <JBoss-AS-7-Home>/modules/com
  2. Create folders mysql/main and copy the above downloaded JAR file(mysql-connector-java-5.1.21-bin.jar) in it.
  3. So your folder structure should now look like:<JBoss-AS-7-Home>/modules/com/mysql/main/mysql-connector-java-5.1.21-bin.jar
  4. Now that the Driver/Connector JAR is present, we need to define it for the Application Server.
  5. Goto: <JBoss-AS-7-Home>/modules/com/mysql/main folder where you copied the JAR file and create another file module.xml
  6. Paste the following code into it and save.
<?xml version="1.0" encoding="UTF-8"?>
<module xmlns="urn:jboss:module:1.0" name="com.mysql">
  <resources>
    <resource-root path="mysql-connector-java-5.1.21-bin.jar"/>
  </resources>
  <dependencies>
    <module name="javax.api"/>
  </dependencies>
</module>

Since I’m using mysql-connector-java-5.1.21-bin.jar version so I’ve kept the <resource-root path = “mysql-connector-java-5.1.21-bin.jar”/>  in case you have a different version then give the same in the path attribute above, highlighted in the code-snippet.

Add the Driver reference in the Server

  1. Goto: <JBoss-AS-7-Home>/standalone/configuration/standalone.xml
  2. In the standalone.xml file add the following line in the <drivers> node.
<driver name="mysql" module="com.mysql"/>

This configures the support for a MySQL datasource in your JBoss Application server.

If you wish you can add your datasource in the standalone.xml file itself. But I prefer to keep the datasource file in my Application.

Creating the Datasource

  1. Create an xml file your-datasource.xml under your WEB-INF folder.
  2. This is a sample datasource file. my-sample-ds.xml

<?xml version="1.0" encoding="UTF-8"?>

<datasources xmlns="http://www.jboss.org/ironjacamar/schema"
 xmlns:xsi="http://www.w3.org/2001/XMLSchema-instance"
 xsi:schemaLocation="http://www.jboss.org/ironjacamar/schema http://docs.jboss.org/ironjacamar/schema/datasources_1_0.xsd">
 <!-- The datasource is bound into JNDI at this location. We reference
 this in META-INF/persistence.xml -->
 <datasource jndi-name="java:jboss/datasources/your-ds"
 pool-name="sample-pool" enabled="true"
 use-java-context="true" jta="true">
 <connection-url>jdbc:mysql://your-server-address/your-db-name</connection-url>
 <driver>mysql</driver>
 <security>
 <user-name>your-username</user-name>
 <password>your-password</password>
 </security>
 </datasource>
</datasources>

Referencing the datasource in your application

  1. Now that we have everything, we just need to refer this in our application.
  2. We can do this from persistence.xml if you’re using JPA standards.
  3. This is a sample persistence.xml which I keep under META-INF directory.

<?xml version="1.0" encoding="UTF-8"?>
<persistence version="2.0"
 xmlns="http://java.sun.com/xml/ns/persistence" xmlns:xsi="http://www.w3.org/2001/XMLSchema-instance"
 xsi:schemaLocation="
 http://java.sun.com/xml/ns/persistence
 http://java.sun.com/xml/ns/persistence/persistence_2_0.xsd">
 <persistence-unit name="primary">
 <provider>org.hibernate.ejb.HibernatePersistence</provider>
 <jta-data-source>java:jboss/datasources/your-ds</jta-data-source>

 <exclude-unlisted-classes>false</exclude-unlisted-classes>
 <properties>
 <!-- Properties for Hibernate -->
 <property name="hibernate.show_sql" value="true" />
 <property name="hibernate.hbm2ddl.auto" value="update" />
 <property name="hibernate.use_sql_comments" value="true" />
 <property name="hibernate.dialect" value="org.hibernate.dialect.MySQLDialect" />
</properties>

</persistence-unit>

</persistence>

I used Hibernate above as my default JPA provider.

So this was all about creating and configuring a MySQL datasource in JBoss AS 7.

Binding nested objects, complex properties with Spring’s form:select tag.

While creating a form for an Entity (say Movie), it so happens that due to some business scenarios linking this entity with some other Entity (say Actor) becomes inevitable.  Let’s see the following code snippets of the above two entities.
Movie.java

public class Movie {
 . . .
      private int movieId;
      private String movieName;
      private Actor actor;
 . . .
}

Actor.java

public class Actor {
 . . .
       private int actorId;
       private String actorName;
 . . .
}

And then during the creation of Movie you need to link it with an Actor.

How do you do that?

Using <form:select>. Yes, but there’s  little more than that 😉

So we go ahead and prepare a view for Movie entity, which will have a text field for Movie’s name and a drop down (select tag) to link it with some Actor.

In the JSP page we’ll have the following code to take care of it.

<!-- Input field for Movie's name -->
<form:input path="movieName"/>

<!-- Select Tag, for giving the actors as a Dropdown -->
<!-- From Controller we'll set a list of Actors in Model and send it for this JSP -->
<form:select path="actor">
<form:options items="${actorList}" itemValue="actorId" itemLabel="actorName"/>
</form:select>

This all looks good, but once you submit you get to see a fat, ugly error.

This happens because Spring tries to bind the Movie object with Actor. And instead of getting an object all it gets is the Id field for actor, as that’s the value going to the Controller if you select an option.

<form:options items="${actorList}" itemValue="actorId" itemLabel="actorName"/>

So for any option selected itemValue attribute will contain the Id of the Actor above and Spring will try to set this itemValue in actor property of class Movie, but here the property actor isn’t a primitive one, rather it’s complex as it’s an object in itself.

So, to overcome this we need to convert the Id property of Actor into a full fledged Actor object. Prior to Spring 3, PropertyEditors were employed, but gone are those days!

We’ll use Formatters, the new kid on the block!

To do that, first we need to write a class implementing the Formatter<T> interface.

package org.springframework.format;
public interface Formatter<T> extends Printer<T>, Parser<T> {
}

So, we’ll create a class ActorFormatter.java

/* ActorFormatter.java */

//Removed the imports for brevity

@Component
public class ActorFormatter implements Formatter<Actor> {
     @Autowired
     private ActorService actorService;
     //Some service class which can give the Actor after
     //fetching from Database

     @Override
     public String print(Actor actor, Locale arg1) {
           return actor.getActorName().toString();
     }

     @Override
      public Actor parse(String actorId, Locale arg1) throws ParseException {
           return actorService.getActor(actorId);
           //Else you can just return a new object by setting some values
           //which you deem fit.
      }
}

Now, we’ve to register this formatter with Spring. To accomplish that, write the following in your WebApplicationContext file, or the config xml file.


<mvc:annotation-driven/>

<bean id="conversionService" class="org.springframework.format.support.FormattingConversionServiceFactoryBean">
      <property name="formatters">
           <set>
                 <ref bean="actorFormatter"/>
           </set>
      </property>
</bean>

Now, if you’re using Spring MVC then you don’t need to do anything, except putting an @Valid annotation in front of @ModelAttribute in your @RequestMapping.

@RequestMapping("/movie")
public String createMovieForm(@ModelAttribute("movie") @Valid Movie movie, BindingResult result, Model model) {
. . .
}

But if you’re using Spring MVC Portlet, then this @Valid won’t trigger the conversion strategies, and in which case you’ll need an @InitBinder.
So just include the below code snippet in your Controller.

@Autowired
private ConversionService conversionService;
//Autowiring the ConversionService we declared in the context file above.

@InitBinder
public void registerConversionServices(WebDataBinder dataBinder) {
       dataBinder.setConversionService(conversionService);
}

So, that’s all for this one. 🙂

JSON: Troubleshooting circular dependency errors!

If you’re using Object Relational Mapping frameworks like Hibernate, and are using the bi-directional mappings then you can be sure of getting the following errors if you try to generate JSON of the entities involved.

1. If you’re using Jackson


com.fasterxml.jackson.databind.JsonMappingException: Infinite recursion (StackOverflowError)

2. If you’re using Google’s Gson


java.lang.IllegalStateException: circular reference error

Let’s take a case of two entities Actor, and Movie having a bi-directional relationship and using them we’ll see how to get over the above exceptions when we try to generate JSON.

This solution uses Jackson for generating JSON.

So if you’re using Google’s Gson you’ll have to write an exclusion strategy yourself, and more importantly the rest of the post is useless for you, unless you’re willing to switch to Jackson like I did with such great finesse! 😉

If yes, then you can download Jackson’s libraries and continue reading the post further, rest assured that it’ll be of immense help to you! 🙂

Now, these entities will have a many-to-many relationship amongst them. As one Actor can act in many Movies and one Movie can have many Actors (as it so often happens, and by the way due apologies for being trite and rhetoric!).

Actor.java

@Entity
@Table(name="Actor")
public class Actor implements Serializable {
  . . .
       /* This is the exception-saving-annotation */
       @JsonManagedReference
       @ManyToMany
       private List<Movie> movies;
  . . .
}

Movie.java

@Entity
@Table(name="Movie")
public class Movie implements Serializable {
 . . .
      /* This is the exception-saving-annotation */
      @JsonBackReference
      @ManyToMany(mappedBy="movies")
      private List<Actor> actors;
 . . .
}

So all we did was adding two annotations to the fields having a relationship.

  1. @JsonManagedReference: This annotation should be put on the owner of the relationship, or as you may deem fit.
  2. @JsonBackReference: This annotation should be used on the other end of the relationship.

Now, having done that it’s extremely easy to generate the JSON.

//com.fasterxml.jackson.databind.ObjectMapper
ObjectMapper objectMapper = new ObjectMapper();
//The input argument of the writeValueAsString() function can be a bean, array, list, map or a set.
String actorsAsJson = objectMapper.writeValueAsString(actorsList);
//actorsList is a variable of type List<Actor>
//Voila! You're done!

That’s all for the circular dependency errors.

~ Entity Class Code Snippets by Amit 

~Jackson JSON processor

Backing up data in Windows!

We all need to backup our data from time to time, be it project, personal or even miscellaneous. And, I’m no exception either! So here I was routinely taking backups using the customary Ctrl+C, Ctrl+V (Copy, Paste) in Windows, and then from nowhere an idea of an automatic script popped up, but it wasn’t long, before my indolent-self gave up seeing the amount of googling I would have to do in order to come up with something-even-remotely-working, as my scripting skills are no better than a 4 year old’s! But, somehow I stood up against all odds (Lol) and the rest was history!

The things which you’ll need:-

  1. 7-Zip
  2. Windows Vista or above (it means Windows 7 ;))

The following is the script which not only takes the backup but also compresses it. That’s what I call efficient programming! 😀

And if you thought, it was only enough, you also get a log file containing all the details of the copy operation, absolutely free! 🙂


@ECHO OFF

REM Script to backup the data.
 REM Author - Ankeet Maini
 REM Last Updated - 23rd April, 2012
 REM Minimum requirements: Windows Vista and above, 7-Zip

ECHO Starting back-up process.
 ECHO Copying files...

REM robocopy is the Windows Robust File Copy Command
 REM robocopy[Syntax] <source> <destination> [options]
 REM Source folder = "D:\Project\Dummy"
 REM Destination folder = "D:\Backups\Project-Backup-%date%"

robocopy "D:\Project\Dummy" "D:\Backups\Project-Backup-%date%"  /e /v /np /log+:"D:\BackupLogs.txt"

ECHO Files copied.
 ECHO Compressing the backup data using 7-Zip...

START "Compressing the backup..." /wait "C:\Program Files\7-Zip\7z.exe" a -tzip -r -mx5 "D:\Backups\Project-Backup-%date%" "D:\Backups\Project-Backup-%date%"

ECHO Data is compressed.
 ECHO Cleaning up...

RMDIR /S /Q "D:\Backups\Project-Backup-%date%"

ECHO Finished cleaning, and backing up.

All you need to do is to change the SOURCE, DESTINATION, Log file and 7-Zip folders’ paths and you’re good to go. The above script copies the data and puts it to the destination path while appending the current system date to the folder name for easy restoration later!

To actually execute the script, copy paste the above code in a notepad, and change the extension to .bat, run the batch file after altering the source folder(of which you want to take the backup), destination folder(the place where you want to save the backup) and you’re done!

You can check the log file in case something went awry. You can even go a step further and schedule it in Windows scheduler to make it run automatically on a specified date and time.

So try it out, and if you stumble across something even better, do let me know!

Binding date in Spring!

Almost often, we have a situation that a Date field is a part of our domain object. And we rely on Spring for binding this domain object with the view so as to minimize the hassles of dealing with the fields individually, and then setting them in the object in controller.

Let’s suppose we have a domain entity, Book, which has some customary fields (along with the dreaded field Date too) shown in the form below.

So lets now try our luck filling this form. So, there we go.

But, binding date isn’t that straightforward. If you ever tried to bind the date, you must have inevitably got the following error message:

Failed to convert property value of type java.lang.String to required type java.util.Date for property date; nested exception is java.lang.IllegalStateException: Cannot convert value of type [java.lang.String] to required type [java.util.Date] for property date: no matching editors or conversion strategy found

And even if you by passed the bean validation, your Controller would return a null for the corresponding date field.

Well, there are two easy solutions.

First: Very Easy Solution

This doesn’t asks you to do anything in your code, but limits your input to a date, whose separators should only and only be ‘/’. E.g. dd/MM/yyyy , yyyy/MM/dd, yyyy/MMM/dd

So, now filling the above information by using “/” as separators and submitting the page.

So this was the first solution.

Second: Easy Solution (Using InitBinder)

This method gives you the freedom, to get your date input in whichever format you like, and with whatsoever separators you desire.

All you need to do is to place this code-snippet in your Controller.


@InitBinder
public void initBinder(WebDataBinder webDataBinder) {
 SimpleDateFormat dateFormat = new SimpleDateFormat("dd-MM-yyyy");
 dateFormat.setLenient(false);
 webDataBinder.registerCustomEditor(Date.class, new CustomDateEditor(dateFormat, true));
 }

With this you specify to the Container that you’ll be inputting the date in this very format, and he will do the rest for you.

Let’s try a very bizarre format, dd==MMM==yyyy

To accommodate this above format, change the format declared in InitBinder,


@InitBinder
public void initBinder(WebDataBinder webDataBinder) {
SimpleDateFormat dateFormat = new SimpleDateFormat("dd==MM==yyyy");
dateFormat.setLenient(false);
webDataBinder.registerCustomEditor(Date.class, new CustomDateEditor(dateFormat, true));
}

Filling in the form with our new date format.

Lets see if it passes the litmus test on submitting the page.

Bingo it did! And all we did was to change the format in Controller, so you can set any format and be assured, you won’t get any ugly surprises(exceptions!).

Download Source Code

You can download the source code from here

The Quintessential – Life and JavaScript enthusiast!